Have you played Minesweeper? Make one yourself
Minesweeper might be the first computer game many students played when they first encountered computers. This time, we will create a Minesweeper game using web front-end programming, with about 140 lines of main code (excluding comments).
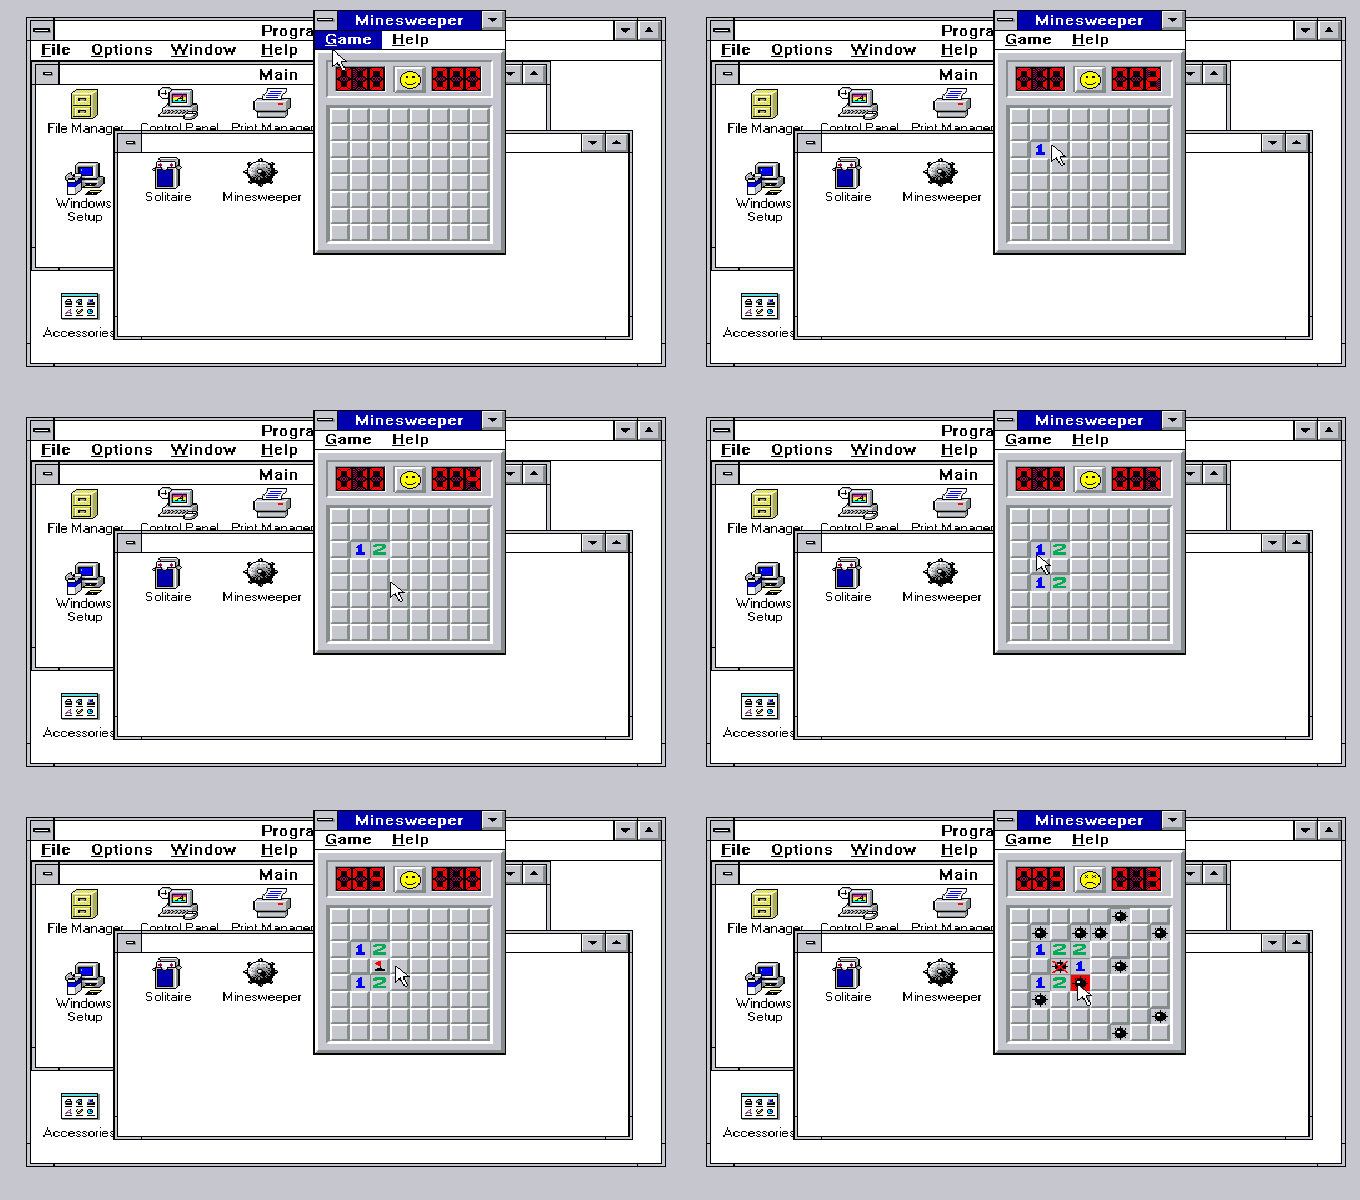
A nostalgic moment, the image below shows the Minesweeper game from Windows 3.1

For those who have never played this game, the rules are very simple: there are only two actions, 1 to dig, and 2 to mark mines. You win by marking all the mines with flags, and you lose if you dig into a mine. The numbers in the opened squares represent the number of mines in the surrounding squares. The center square has 8 surrounding squares, edge squares have 5, and corner squares have 3.
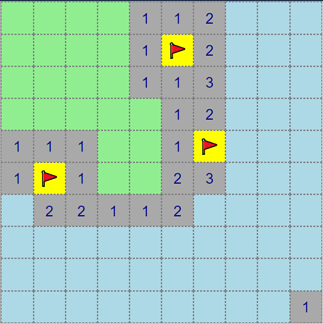
The image below is the Minesweeper game we created, click here to experience the completed version. Left-click represents the digging action; right-click or long press represents the marking action.

Preparation Phase
This article requires a basic understanding of HTML, JavaScript, and CSS. However, don't worry; I will introduce key points during the writing process. If you lack confidence, you can refer to my previous articles for supplementary information.
You can use VSCode or Atom as your code editor. Of course, theoretically, Notepad can also be used, but it lacks syntax highlighting and helpful prompts, making it more tedious to write code.
Create a folder to store the project files, naming it js-minesweeper or another name you prefer, but try to avoid using Chinese names. Inside, create the following three files (the entire project only requires these three files):
File 1 index.html
Write the following content inside
<!DOCTYPE html>
<html lang="en">
<head>
  <meta charset="UTF-8">
  <meta name="viewport" content="width=device-width, initial-scale=1.0">
  <title>Minesweeper</title>
  <script src="app.js"></script>
  <link rel="stylesheet" href="style.css">
</head>
<body>
  <div class="grid"></div>
</body>
</html>
Once you save this file, you won’t need to modify it much. The first line is usually used to declare the file format; <!DOCTYPE html> tells the browser that this is a file conforming to the HTML5 standard. The HTML file has a nested structure, with the root node html containing all content, followed by the head and body nodes.
The head node defines the page's encoding format, title, and external files to be referenced.
In the body node, we define a div node with the class name grid. The entire Minesweeper game page elements will be dynamically inserted into this node using javascript code, essentially serving as a container (large frame) that holds all the elements. The size of this container depends on the number of elements inside and the definitions in css.
File 2 app.js
The main code file, which is referenced by the index.html file (see line 7 of the above code). The following sections will detail the content written within it.
File 3 style.css
The main style file used to define the color appearance of page elements. It is also referenced by the index.html file.
*, body {
  margin: 0;
  padding: 0;
  box-sizing: border-box;
  font-family: Arial, Helvetica, sans-serif;
}
.grid {
  white-space: nowrap;
  user-select: none;
  -moz-user-select: none;
  -ms-user-select: none;
  -webkit-user-select: none;
  -webkit-touch-callout: none;
}
First, define the global appearance by removing margins, padding, and setting a sans-serif font; secondly, define the grid container to not wrap automatically, as long-press operations are needed on mobile, so the text selection feature is disabled.
Getting to the Point
Next, it's time to officially start working. First, open app.js and write the following code:
// app.js
document.addEventListener('DOMContentLoaded', () => {
  // Execute after all files have loaded, write all remaining js code inside these curly braces
});
The document refers to the entire page, and addEventListener adds an event listener function that listens for the DOMContentLoaded event. The document object will emit this event after all referenced files on the page have loaded, and then the arrow function on the right will be executed.
Declaring Global Variables
// app.js
// Continuing from the previous text, omitted some code...
const cols = 10; // Number of columns in the game board, temporarily set to 10 columns
const rows = 10; // Number of rows in the game board, temporarily set to 10 rows
const ratio = 0.2; // Ratio of mines, temporarily set to 20%, meaning 20 mines in 100 squares
const blocks = []; // Array of all squares, used to store all generated squares
let isGameOver = false; // Flag indicating whether the game is over, initially set to not over
The above code defines the constants (const) and variables (let) that will be used next. Constants are declared for values that will not change during the game, such as the mine ratio, number of rows, and number of columns; variables are declared for values that may change.
Let’s focus on the blocks array, which serves as a container for all squares. A single square will be referred to as a block in the subsequent code, with "block" meaning a piece. Thus, its container is in plural form. Each square is the basic element of this game; it may contain a mine or not, display numbers, flags, the effect of exploding mines, and have different colors.
Create Board
Next, it's time to declare a function to create the board, generating the grid of the entire board according to the given number of rows and columns. See the code below.
// app.js
// Continuation of the previous text, some code omitted...
function createBoard() {
  const grid = document.querySelector('.grid');
  for (let i = 0; i < cols * rows; i++) {
    let block = document.createElement('div');
    block.id = i;
    block.innerText = i; // Display the index in the grid
    block.addEventListener('click', clickHandler);
    block.addEventListener('contextmenu', rightClickHandler);
    grid.appendChild(block);
    blocks.push(block);
    if (i % cols == cols - 1)
      grid.appendChild(document.createElement('br'));
  }
}
createBoard();
The function is named createBoard. On line 4, it retrieves the div container grid from the HTML page, making it convenient to add the grid squares to the container in the following code; line 5 creates a loop to generate all squares, currently creating a total of 100 squares in a 10-row by 10-column grid, with the variable i ranging from 0 to 99.
Inside the loop, on line 6, it uses the createElement method to create a page element; line 7 sets the id attribute of the square to the index i; line 8 displays the index in the square, which is convenient for debugging during development, and will be removed after confirming there are no issues; lines 9 and 10 add two event handler functions to the block, with the clickHandler function handling the click event and the rightClickHandler function handling the contextmenu event. These two functions have not been declared yet and will be written in the upcoming User Operation Event Handling section; lines 11 and 12 add the squares to the HTML page's container and also to the JS code's blocks array, the former for displaying them on the page and the latter for easier control in the code later, as the order of addition matches the index, so the array index and square index are the same.
Lines 13 and 14 add a line break element to the block container after every 10 squares (depending on the value of cols). For example, when i equals 9, 9 % 10 equals 9, meaning that every time the remainder is 9, it indicates the last element of each row.
On line 17, the createBoard function is immediately called after its declaration.
Open index.html in the browser to check the running effect; what you see is still a blank page because we have not yet set the appearance for these squares. Open the style.css file in the editor and save the following content.
/* style.css */
/* 接上文,省略部分代码... */
.grid div {
  width: 35px;
  height: 35px;
  color: darkblue;
  background-color: lightblue;
  display: inline-block;
  text-align: center;
  vertical-align: middle;
  line-height: 35px;
  border: 1px dashed grey;
  cursor: pointer;
}
The above code defines the width and height of the squares as 35 pixels, the text color as dark blue, the background color as light blue, the display mode as inline-block (div elements are block elements by default and occupy a whole line), centers the text, sets the border to a 1-pixel gray dashed line, and changes the mouse pointer to a hand.
Refresh the browser, and you should see a 10×10 grid of light blue squares with dashed lines, with numbers representing their sequence.
Bomb Placement
Next, we need to randomly place a specified number of bombs in these squares. The overall idea is to first calculate the total number of bombs and the total number of non-bombs, generate these states according to their quantity and put them into the same array, and then shuffle their order.
// app.js
// Continuing from the previous text, some code omitted...
function setupBomb() {
  let amount = Math.floor(cols * rows * ratio);
  let array = new Array(cols * rows - amount).fill(false);
  array = array.concat(new Array(amount).fill(true));
  array = array.sort(() => Math.random() - 0.5);
  blocks.forEach((block, id) => {
    block.hasBomb = array[id];
    block.total = 0;
    // Calculate the total number of bombs around
    getAroundIds(id).forEach((_id) => {
      block.total += array[_id] ? 1 : 0;
    });
  });
}
setupBomb();
In the above code, line 4, amount is the total number of bombs; line 5 creates an array and fills it with non-bomb states false; line 6 fills it with bomb states true; line 7 shuffles all the elements randomly;
Starting from line 8, it iterates through all the squares, setting whether or not each square contains a bomb in the hasBomb property of each square. The forEach function will pass each square object block from blocks and its index id to the arrow function for execution;
Starting from line 10, it sets the total number of bombs around each square total, with an initial value of 0; line 12 is a custom function getAroundIds, which, as the name suggests, we expect this function to work as follows: Given any index based on the current board's row and column layout, it can return an array of indices for all surrounding squares; for example, inputting 0 would yield [1,11,10], and inputting 11 would yield [0,1,2,12,22,21,20,10]; we will implement this function later, and for now, we will assume it works smoothly. In the arrow function, we check whether these surrounding squares contain bombs; if they do, we add 1 to total, otherwise we add 0 (line 13).
getAroundIds Function
Before writing this function, we looked at the previously generated chessboard effect and noticed:
Most squares near the center of the chessboard are always surrounded by the 8 squares: upper left, upper, upper right, right, lower right, lower, lower left, and left; while the edge squares have at most 5 surrounding squares, and the corner squares have at most only 3 surrounding squares. We need to pay special attention to these situations.
There are many different ways to implement the functionality of this function; below is my version:
// app.js
// Continuing from the previous text, some code omitted...
function getAroundIds(id) {
  const ids = [];
  const notTopEdge = (id) => id >= cols;
  const notLeftEdge = (id) => id % cols != 0;
  const notRightEdge = (id) => id % cols != cols - 1;
  const notBottomEdge = (id) => id < cols * rows - cols;
  if (notTopEdge(id)) {
    if (notLeftEdge(id)) {
      ids.push(id - cols - 1); // top left
    }
    ids.push(id - cols); // top
    if (notRightEdge(id)) {
      ids.push(id - cols + 1); // top right
    }
  }
  if (notRightEdge(id)) {
    ids.push(id + 1); // right
  }
  if (notBottomEdge(id)) {
    if (notRightEdge(id)) {
      ids.push(id + cols + 1); // bottom right
    }
    ids.push(id + cols); // bottom
    if (notLeftEdge(id)) {
      ids.push(id + cols - 1); // bottom left
    }
  }
  if (notLeftEdge(id)) {
    ids.push(id - 1); // left
  }
  return ids;
}
Line 4 defines an empty array to store the function's return results. From the last line of the function body (line 33), we can see that regardless of the execution result, ids is returned;
Lines 5-8 contain some internal helper functions for auxiliary judgment aimed at improving code quality and readability. If the parameter id meets the conditions, it returns true (logical truth value). notTopEdge indicates it is not the top edge, notLeftEdge indicates it is not the left edge, notRightEdge indicates it is not the right edge, and notBottomEdge indicates it is not the bottom edge;
Starting from line 9, we determine and calculate the indices of the squares surrounding the square in a clockwise direction. For example, as long as the input square index is not the upper left corner, there will be the upper left square, and each calculated index will be inserted (push) into the result array.
User Operation Event Handling
Now it's time to handle user operation events. The first operation is to uncover a square, and the second operation is to mark a mine; these correspond to the clickHandler and rightClickHandler callback functions mentioned earlier.
clickHandler Callback Function
This is the callback function for the square click click event, used to respond to the user's mine uncovering operation. Here's the code with comments added; the logic should be quite clear.
// app.js
// Continuing from the previous text, some code omitted...
function clickHandler(e) {
  if (isGameOver) {
    return; // If the game is over, do not proceed further
  }
  let block = e.currentTarget;
  if (block.checked || block.marked) {
    return; // If already dug or marked, do not proceed further
  }
  if (block.hasBomb) {
    // This block has a bomb, game over
    isGameOver = true;
    blocks.forEach(block => {
      // Trigger each bomb, displaying an explosion emoji
      if (block.hasBomb) {
        block.classList.add("boom");
        block.innerText = '💥';
      }
    });
    setTimeout(() => {
      // Show game over prompt, asking if the player wants to play again
      if (confirm('BOOM...GAME OVER! Play Again?')) {
        // If confirmed to play again, reload the page
        location.reload();
      }
    }, 50);
  } else {
    // Case when there is no bomb in this block
    if (block.total == 0) {
      // No bombs nearby, enter a safe block for recursive checking, detailed below
      checkBlock(block);
    } else {
      // There are bombs nearby, show as dug and display the number of bombs
      block.classList.add("checked");
      block.innerText = block.total;
    }
  }
  // Mark as dug
  block.checked = true;
}
In the above code, lines 17 and 35 add two types of CSS classes to the blocks: one is boom for explosions, and the other is checked for dug blocks. Additionally, we will introduce a new class safe for blocks that are dug and have no bombs around them. The corresponding effects should be added in style.css with the following CSS code:
/* style.css */
/* Continuing from the previous text, some code omitted... */
.grid div.boom {
  background-color: red;
  font-size: larger;
  cursor: default;
}

.grid div.checked {
  background-color: darkgray;
  cursor: default;
}

.grid div.safe {
  background-color: lightgreen;
  cursor: default;
}
The approach here is to set the background color of the grid to red during an explosion, gray for the uncovered safe blocks, and light green for the surrounding uncovered safe blocks.
checkBlock Safe Block Detection
The purpose of this function is to automatically uncover all connected safe blocks whenever a safe block with no surrounding mines is dug up (when the total value is 0). This involves the use of recursion.
function checkBlock(block) {
  // The block that can enter this function is surrounded by no mines, so it is displayed as safe
  block.classList.add("safe");
  // Iterate through the surrounding blocks
  getAroundIds(Number(block.id)).forEach(id => {
    let a_block = blocks[id];
    if (a_block.checked || a_block.marked)
      return; // Skip already dug or marked blocks
    a_block.checked = true;
    if (a_block.total == 0) {
      // No mines nearby, recursively check if the surrounding blocks are also safe
      checkBlock(a_block);
    } else {
      // There are mines nearby, display as dug up and show the number of mines
      a_block.classList.add("checked");
      a_block.innerText = a_block.total;
    }
  });
}
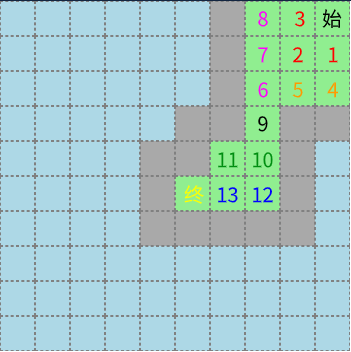
As illustrated in the figure below, the colored numbers indicate the order in which the checkBlock function recursively checks the safe blocks. Blocks of the same color represent the same function call. Starting from the top right corner, a total of 8 recursive calls can be seen, terminating when no more qualifying safe blocks are found; the recursion order is: start -> (1,2,3), 1 -> (4,5), 2 -> (6,7,8), 6 -> (9), 9 -> (10,11), 10 -> (12,13), 13 -> (end).

rightClickHandler Callback Function
This is the callback function for the contextmenu event triggered by right-clicking on a block, used to respond to the user's flagging operation, directly accompanied by the commented code.
function rightClickHandler(e) {
  e.preventDefault();
  if (isGameOver) {
    return; // If the game is over, do not proceed further
  }
  let block = e.currentTarget || e.target;
  if (block.checked) {
    return; // If already opened, do not proceed further
  }
  // Toggle the marking status of the block; marked becomes unmarked, unmarked becomes marked
  block.marked = !block.marked;
  block.classList.toggle('marked');
  // When marked, display an emoji flag symbol on the block
  block.innerText = block.marked ? '🚩' : '';
  if (blocks.every(block => (block.hasBomb && block.marked) || (!block.hasBomb && !block.marked))) {
    // If every bomb is marked and the unmarked ones are not bombs, declare victory
    isGameOver = true;
    setTimeout(() => {
      alert('YOU WIN!'); // Notify you that you won
    }, 50);
  }
}
All the code is now complete, and the task is accomplished! Open your browser and give it a try.
